Showing posts with label in the kitchen. Show all posts

Wednesday, July 11, 2012

Parades, Fireworks, And Cookie Dough Dip


Here in Center County the 4th of July festivities go on for days. Each small borough had a parade and many have firework displays, all of this happening on different days. 


Our city had their annual Fireman's Parade this past Saturday. After the parade my neighbor hosted a  party. I had intended on bringing a tray of cake pops to the party but could not bring myself to turning on my oven to bake the cake needed to make the pops. So I had to rethink my plan. I had pinned a recipe for a dip on one of my boards on Pinterest. I took another look at it and decided to take a chance on it. I'm glad that I did. It was a hit with everyone.

I had to leave the leftovers behind because I knew that we could consume all of the leftovers that evening. Better that all of the kids eat it and not me.

This dip comes together in less than five minutes and is ready to head out the door without any time in the refrigerator for all of the flavors to mingle. It is very akin to a decadent frosting that you dip a cookie into. Feel free to put as much on a cookie as your heart desires.

Cookie Dough Dip

1 8 oz package cream cheese softened
1/2 cup butter softened
1 teaspoon vanilla
1 cup powdered sugar
2 tablespoons brown sugar
1 cup mini chocolate chips
1 cup toffee bits


1. Cream together the cream cheese, vanilla, and butter.
2. Add in the remaining ingredients and mix till well combined.
3 Serve with graham cracker, vanilla wafers, and apple wedges.

Source: Add a Pinch

Monday, July 9, 2012

Avalanche Bars, Yummy Gluten Free Goodness

I love these bars, they are gluten free and don't require the use of the stove or oven. They are a great last minute dessert option when you don't know what to take to a party or just want a sweet treat. Best of all they are delicious.
To make this delicious treat you will need one bag of white chocolate chips, 1/4 cup peanut butter, three cups rice krispies, 1/4 cup mini chocolate chips and 1 1/2 cups mini marshmallows. A pretty simple list of ingredients.
Before you begin, prepare a 8 x 8 pan by lining it with parchment paper or spraying it with non-stick spray.
Place the white chocolate chips in a microwave bowl and heat on medium power for 30 seconds at a time till melted. This step took my microwave four 30 second increments. Add the peanut butter and mix to combine. Stir in the rice krispies and combine till  all of the cereal is mixed  and well coated with the peanut butter and chocolate mixture. Lastly mix in the marshmallows and mini chocolate chips. 
Pour or plop mixture into the prepared pan and lightly press into pan. Lastly add an additional 3 tablespoons of mini chips on top. Cut into squares and enjoy.
Source:Cookies & Cups

Tuesday, June 19, 2012

Icebox Cheesecake, From My Mother's Recipe Box

My mom would make this pie when strawberries were in season. In California it seemed like a very long season most of late winter and all of early spring. Here in Pennsylvania strawberry season is short, you can blink and miss it.


So with a few jars of fresh homemade strawberry jam I decided to break out this recipe and treat my family. I will be honest, we don't often use cool whip. I prefer fresh whipped cream. But since I wanted to make it like my mom did, I caved in a bought a tub of it.

My son whooped with glee when he saw the ingredients. He knew there was a cream pie in his future. "When are we going to eat it?" was his first question. The day was a very long one, anticipating the evening when he would finally able to have a slice of pie.


I used strawberry jam that I made a couple of weeks ago for the topping. I also garnished it with a few fresh berries before I served it. I made an almond crust and used a tart pan. One piece of advice, place the jam on the pie just prior to serving. My mom made a glaze and placed big mounds of fresh berries on top. Do as you choose, either way is delicious.


Icebox Cheese Pie
fills one regular pie crust


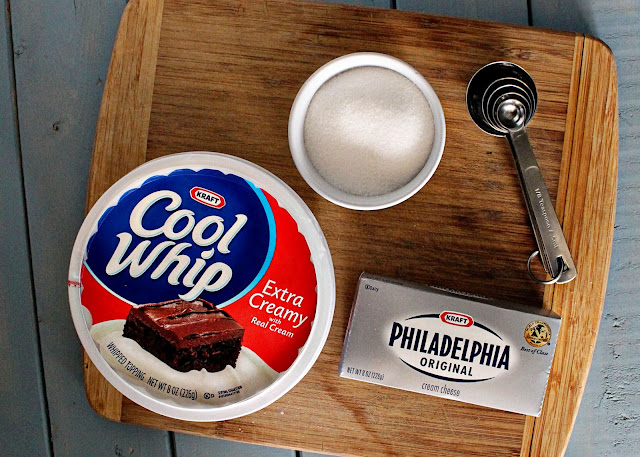
2 (8 oz.) packages of cream cheese, softened
1/3 cup sugar
1 8 oz. tub of cool whip thawed
1 pie crust


1. Beat cream cheese till fluffy, add in sugar and combine till mixed well.
2. Add in cool whip and mix till well blended.
3. Spoon into crust and refrigerate for at least three hours or until firm.
4. Before serving add fresh berries of your choice.


Enjoy

Monday, June 18, 2012

A Weekend Full of Late Late Nights

The days full of outside activity and the evenings full of movies and Big Bang Theory. That kind of sums up our weekend.


I picked the last of the bok choi that was hiding near the swiss chard and a lot of kale from the garden. I really need a dehydrator to make kale chips. Most of the tomatoes are staked and have plenty of support.

Sadly I did not work on my scarf. But I did start and finish two books this past week. Night Road.and Sarah's Key, both page turners and quick reads. I'm not sure if I can say if one or another was a favorite. I enjoyed them both. Now on to this book. I have a goal of reading two books a month, pretty achievable as long as I stay on track.


Tonight I am making an ice box tart from my mom's recipe box. I love taking my time with these types of recipes, memories flooding back of my mom, sister, and I in the kitchen learning from her and and just being close to those I love. I hope to share this recipe with you tomorrow.

Wednesday, June 13, 2012

My Sorbet Recipe

Yesterday I shared with you pictures of my strawberry sorbet and a memory from long ago. I was thinking about memories for a while yesterday and how smell is one of the biggest triggers, bringing back scenes both good and bad. Sometimes my son will get a whiff of something and say, "This smells like Sherry's house!" Sherry babysat Nathan for years. We all have fond memories of her and the love and care that she showered down on Nathan from such a young age.


So on to the recipe that I promised yesterday for the sorbet. A word about this sorbet recipe. I use it to make many different kinds of sorbets, mostly fruity one. You will need to make a simple syrup of equal parts sugar and water that is heated till the sugar crystals are dissolved. Make sure that your simple syrup is cold before you begin.


Strawberry Sorbet or Granita
The night before you make the sorbet make the simple syrup and freeze your ice cream maker insert.


2 quarts of strawberries hulled and rinsed
1 cup simple syrup

1. To a food processor or blender add the berries and blend till you have a fruit puree with no chunky bits.


2. Strain into a container that you can chill the mixture in. Strain until you only have seeds left in the strainer, yo may need to use a spatula to push that last bits of strawberry through.The container will need to be big enough for the fruit puree and the simple syrup  addition.


3. Start by mixing in 1/2 cup of the simple syrup and taste. Most of my sorbets require 3/4 cup. Give the mixture a good stir. Place in refrigerator to chill for at least 3 hours.


4. Follow manufacture instructions for your ice cream maker for sorbet. I use a KitchenAid ice cream attachment and it takes about 20 minutes for my mixture to become firm enough to scoop. You can now freeze the sorbet to firm up even more.


5. To make granita place the cold mixture into a freezer safe container and freeze for one hour. Starting at this time pull out the container and using a fork give it a stir, making sure to get the bottom and edges. Repeat the stirring every 30 minutes until you have small uniform ice crystals. Place lid on the granita and sever that evening. It will take about 5 repeats to get to the granita stage if you start with a cold mixture.

I hope you get a chance to make your own frozen concoction this summer.

Tuesday, June 12, 2012

Strawberry Sorbet, Summer In A Bowl

When I was a teen, I would go to summer camp up in the the Angeles National Forest. One of the highlights of the week was a hike along Strawberry Creek. We would take a packed lunch and make our trek up the path, following the creek till we came to a clearing  where we would stop and eat our lunch and then head back to camp. All along the creek were wild strawberry plants and when we stopped for lunch we would feast on these ripe fragrant gems.

The scent of pine underbrush and ripe fresh strawberries still take me back there to my youth when everything was so simple.

While at farmer's market I spied the first of the ripe fragile delights of my youth. These berries are not the supermarket variety. They more intense, more fragile, more fleeting in their loveliness. So I took a few quart home, cleaned them and put them away to think about what to do with them.

With the first two quarts I made a sorbet. The process was simple and the end result made me look like a superhero. We all stood around the ice cream maker as it turned and worked it's magic. With a dollop of whipped cream, heavenly.

Tomorrow I will share with you the process that I use to make this summer delight. It is the same process that I use to make sorbet and granita.

I hope that your day is a wonderful one.

Thursday, June 7, 2012

Peanut Butter Cookies, Gluten Free


I stumbled upon this cookie recipe and had to read it through a couple of times. What, not flour? I've made flourless cakes, but never cookies. Next I had to read through the comments, people love this recipe, hmmmm. So I hurried to the kitchen to try these out.

My son, "What are you making now?"

Me, "Peanut butter cookies!"

My son, "OHHH, are they to eat?"

I ignored him.


Here they are in all of their peanut buttery goodness. Peanut butter cookies are a thing of beauty. I know that Tony will approve of this post.

Here's the recipe.

Gluten Free Peanut Butter Cookies.
makes about 2 dozen.


1 cup creamy peanut butter
1 cup sugar
1 egg beaten
1 teaspoon baking powder
1/4 teaspoon salt
1 teaspoon vanilla.

Directions


1. Preheat oven to 350. Line a cookie sheet with parchment paper or use silicone baking liners.

2. In a bowl mix dry ingredients together. Add the peanut butter and mix till combined. I used a stand mixer.

3. Add the egg and vanilla and combine until it sticks together and is a dough like consistency.

4. Pour a small amount of sugar into a bowl. Roll tablespoons of dough till they are balls and dip and roll in sugar, place on cookie sheet

5. Using a fork, lightly indent cookies with a crisscross pattern, but do not overly flatten cookies.

6. Bake for 8-10 minutes. Let cool on baking sheet for about 5 minutes before moving to a cooling rack.

Thank you Carol from Simply....Gluten Free for a great and simple recipe. She has some great recipes, check out her site.

Wednesday, June 6, 2012

Fried Rice At Home


Have you ever been to a Chinese restaurant and had a box of leftover rice? Or, perhaps you made a pot of rice for dinner and had some left in the pot. For me and my family, I make rice and then store the remains in the refrigerator. But to be honest, very rarely does it have a second go at the table.

The perfect solution for all of that rice is to make fried rice. I will go on rampages making fried rice for days. Everyone consumes it enthusiastically, like it is the best food ever. But as my crusade to save all unused rice marches on the enthusiasm  diminishes. Then I give it up and go back to my usual way of storing the little bits of leftovers and disposing of it at the end of the week.

For now I am in a fried rice kick and my family is in love with it once again. It is a perfect summer breakfast, lunch, or dinner. It comes together quickly and does not require the oven.

It is really flexible and so many veggies and proteins can be added to it. The only one requirement is that you have about four cups of leftover brown or white rice that is to the is cold.

For this batch I used sliced snow peas, diced bell pepper, green onion, and two eggs.

You will also need 1 tablespoon grated ginger and 1 clove of garlic minced, 2 tablespoons of oil, 1 teaspoon  sesame oil, and 1 tablespoon of soy sauce.


Start by measuring and prepping all of your ingredients.

To a large pan add one tablespoon of oil, when hot add the garlic and ginger and give them a quick stir. Cook for no more than 30 seconds and quickly add your veggies. Cook the veggies til they are just warmed through. I cook them for about one minute. Now it is time to add the rice, keep moving everything around till rice is once again hot.

Make a well in the center and add a bit more oil and then the eggs. Cook the eggs till they are scrambled and mix them into the rice mixture. Drizzle with soy sauce and sesame oil. Garnish with more green onion and serve. This version is much lighter than one you will find at a restaurant and more like what is served at home.


Monday, June 4, 2012

Scottish Oat Cakes

Since going gluten free, I've struggled with breads and baking. At times baking gluten free has taken the sails out of my enthusiasm for being in the kitchen. What has helped me is focusing on what we can eat and there is so much that we can eat that doesn't have gluten. These little cakes are an example of that. They have never been made with any wheat and instead rely on oat flour. You can make your own oat flour by using a food processor until the oats are a fine grind.


We make these often. They are very versatile in that they are great with your morning coffee, as a light snack in the afternoon, or with evening tea. These little biscuits are somewhere between a cracker and a biscuit. The recipe says that they will last in an airtight container for two weeks, but they never last that long in our house to test.


Personally, I love them with a bit of jam or honey in the afternoon with a bit of tea. But they are just as good with a small bit of cheese and a slice of apple.


When scooping with a 4 ounce cookie scoop, bake 15-20 minutes. Two ounce scoops will need less bake time, 12-15 minutes.

Scottish Oat Cakes 
from Vegetarian Times

  • 2 cups old-fashioned oats
  • ¼ cup light brown sugar
  • ¾ tsp. baking soda
  • ½ tsp. salt
  • 1 cup oat flour, plus more for dusting work surface
  • ¼ cup nonhydrogenated shortening or vegan margarine, cut into small pieces 
  • ¾ cup nonfat buttermilk
1. Preheat oven to 325°F. Line 2 baking sheets with parchment paper, or coat with cooking spray.
2. Stir together oats, brown sugar, baking soda, and salt in large bowl.
3. Place oat flour in separate bowl. Rub shortening into oat flour with fingers until mixture is crumbly. Stir in oat mixture, then buttermilk
4. Use a cookie scoop and pack lightly, place on cookie sheet and press to make a biscuit, not to thin.
5. Bake for 15 to 20 minutes, remove from oven and let cool on cooling rack.


Sunday, June 3, 2012

Today I am Grateful


In daily life we must see that it is not happiness that makes us grateful, but gratefulness that makes us happy.
Brother David Steindl-Rast 
Austrian-American Author and Benedictine Monk 


Tomorrow I promise to share a recipe for these beauties. They are delicious in every way.

Thursday, May 24, 2012

Light and Fresh Carrot Salad


When my son was very young we would go to the park and play almost everyday. It was there that we met so many playmates. One of these friends was a little boy, Tomas, from Argentina. It was through his mama that I learned how to make this easy delicious salad.


I say that it is simple because it relies on five ingredients. If you have a couple of hard boiled eggs on hand then you are almost there, and it comes together so effortlessly.


Start by grating carrots on the coarse side of a grater. I use about three carrots if it is for myself and five if I am serving 2. You can buy already grated carrots if you like. 


To the grated carrots add one tablespoon red wine vinegar, a bit more for a double serving. Add some fresh ground pepper and one quarter teaspoon salt. Toss to coat all of the carrot bits. Taste and adjust to your personal preference. I like less vinegar than my son. 


I serve one egg per person. Chop up the white part of each egg, or use the whole egg if you like.


Before serving, add the chopped egg white and give the salad a couple of extra grinds of pepper.


There you have it, Argentinian ensalada de zanahoria. Some people give the whole salad a drizzle before serving, you make the call on that one. I've also read that the salad is also served without the egg.

Tuesday, May 22, 2012

Coffee Magic

I love coffee and coffee loves me. I've tried to send it away and have said goodbye for a few weeks at a time. But I think that it was just waiting on the other side of the door, waiting patiently for me to call it back into my life. I think that it is just that ritual in the morning of pouring a hot cup of coffee and sitting down somewhere comfy to start my day.


But what to do when the weather turns warm and balmy? Why turn to iced coffee of course. Iced coffee is easy to love once you figure out it's quirky nature. You can cheat and start with brewed coffee that has been cooled. But why not start with coffee intended for a cup of ice and not leftovers.


I think that Pioneer Woman has the perfect method. But for me I like to make smaller batches, besides that big container wouldn't fit in my refrigerator. I choose to make a quart at a time. It is a small enough jug to fit into even the most space challenged fridge. 


I start with a quart sized canning jar. To it I add 3/4 to 1 cup of coarsely ground coffee.


I like to add about 1/2 teaspoon cinnamon and 1/4 teaspoon cardamom. I also add 1/4 cup natural sugar at this time.


Now it's time to add the water. I add just enough cold filtered water to sit below the neck of the jar. I use a long chopstick to stir the coffee grinds into the water. They will want to float, just keep stirring and they will hydrate and most of them will want to sink. Once all of the grinds are stirred in and the sugar is dissolved, you might have to add a bit more water to bring it back up to the neck of the jar. 

Put it in the refrigerator and let it sit overnight. I've forgotten about my jar and have let it go as long as 24 hours at a time. 

I like to strain the coffee twice. Once with a fine mesh sieve and then a second time with a coffee filter in the sieve. I think that it goes faster with my method. You can try and strain it once with the filter in place, but it is a much longer process. 

It's ready to pour over ice with a splash of milk or half and half. It is pure magic in a cup. 


If you want to make Thai iced coffee, omit the sugar at the beginning of the process. Add 2 tablespoons of sweetened condensed milk and a splash of milk to your coffee. 

Any way that you make it, you won't be disappointed. Happy coffee drinking.


Monday, May 21, 2012

Cooking From The Farmer's Market, Radish Greens


This past week at farmer's market I purchased some French breakfast radishes. They were of course beautiful and tasty. But when I went to clean them and put them in a bowl, I cringed thinking about throwing the green tops away. So I pulled out the skillet and started cooking. 


I did a quick saute with some garlic and olive oil. An easy and a quick healthy lunch was on the table in no time. Because my radish greens were so young, they didn't need a lot of time in the skillet. Along side some quinoa and a sliced tomato, I would call that a very healthy lunch. The only other thing I did was a drizzle of balsamic vinegar.


So remember, never throw the green radish leaves in the trash. They are the most nutrient dense part of the plant. Radish greens contain a good amount of iron, calcium, antioxidants, vitamins A, C, and K. They taste similar to kale, but are more tender.


As a side note, I started out with organic radishes so they were pesticide free. 

Wednesday, May 16, 2012

Gluten Free Energy Bites.

I was going to talk about a mishap in my kitchen involving that cute little terrier from yesterday, but I am having trouble uploading the evidence. So I will share a recipe that I make about once a week. I first stumbled upon them on the blog Smashed Peas and Carrots.

Theses little guys are a snack staple in our house. They pack well and are pretty flexible as far as recipes go. They can be vegan, gluten free, or paleo friendly depending on what you add to the mix. The other great thing about them is that they don't require baking, so you can make them without turning on the oven.

The things that I don't deviate from are the oats, coconut, and honey. I choose to use honey because it is the glue that binds everything. A friend has used corn syrup and a other agave, I hear that they both work. For the nut butter I use Sunbutter, but peanut butter works great too.  The rest of the ingredients are pretty flexible. I try to stay on the healthy side and add chopped dried fruit and raw seeds or nuts. My favorite combination is dried cherries and toasted sliced almonds that have crushed.


No Bake Energy Bites. (makes about 18 to 20 small bites)

1    cup    oatmeal
1/2 cup    nut butter
1/3 cup    honey
1    cup    coconut flakes
1/2 cup    ground flaxseed
1    cup    mix ins (chocolate chips, seeds, nut, dried fruit)

Mix everything in a bowl till completely incorporated, I use a stand mixer that makes quick work of the process. Chill the mixture for 30 minutes. Use a scoop to make little 1 oz balls. You might need to roll them out in your hands. Enjoy. They are tasty and keep well in the refrigerator.